This article covers the following topics:
-
HTML5.
HTML5is the latest standard ofHTML(HyperText Markup Language). Our example web page is written inHTML5. Later on, if you want to better understand the theme you are using and customise it, you will need this background too. -
CSS3.
CSS3is the latest standard ofCSS. It is used to control a web page’s styling and layout. Later on, if you want to better understand the theme you are using and customise it, you will need this background too.
-
Markdown.
Markdownis also a markup language; its syntax is simpler than HTML and there is less of it to write, and it has a very wide range of uses. Writing a blog on GitHub Pages usually means using Markdown. For example, the blog post you are reading now was written in Markdown. (In principle, GitHub Pages usesJekyllto convert Markdown files into HTML files.Jekyllalso supports Textile files; I won’t go into that here.) -
Alibaba Cloud.
Alibaba Cloud(阿里云) provides services such as domain registration and DNS resolution. Similar products includeTencent Cloud(腾讯云). This tutorial involves custom domains: you can bind a domain you own in order to access the personal blog you have built. The domain I used was registered with Alibaba Cloud, and I use Alibaba Cloud’s DNS resolution service. Domain resolution maps the relationship between a domain name and an IP address. A domain name is like a house number, and resolution is like hanging the sign on the room: wherever you hang it is where the domain name points.
1. Create a GitHub Pages Repository
Create a repository named USERNAME.github.io, where USERNAME is your GitHub username.
Here is the one I created:
2. Upload Web Page Files
GitHub Pages only supports static web pages; it does not support JSP or PHP.
Let’s write a simple HTML file and see what it looks like.
Create an index.html file in the root directory of the repository, with the following content:
<!DOCTYPE html>
<html>
  <head>
    <meta charset="utf-8">
    <title>我的第一个网页</title>
  </head>
  <body>
    <p>网站建设中……</p>
  </body>
</html>
Then just push the file to the repository.
3. How Do You Access It?
The repository name is the domain you access it at; in this tutorial, that is
When you open this link, what it shows may not be the content corresponding to the code above. That’s because I can’t use it as my real homepage!
(In principle, the repository name needs to be the same as the domain name — pay attention to this, and don’t get cause and effect backwards. 🙃️)
4. Custom Domain (Optional)
If you have a domain of your own and want to use it to access the blog, read on. If you don’t need this, you can skip this section.
I have a com domain with the same name as my WeChat Official Account ID, devopscd.com, and I want to use it to access the blog rather than the second-level domain that GitHub provides.
To achieve this you have to work both at the domain registrar and on GitHub Pages.
-
Add a
CNAME recordto Your Own Domain
When you need to point a domain name at another domain name, and have that other domain name provide the IP address, you need to add a CNAME record.
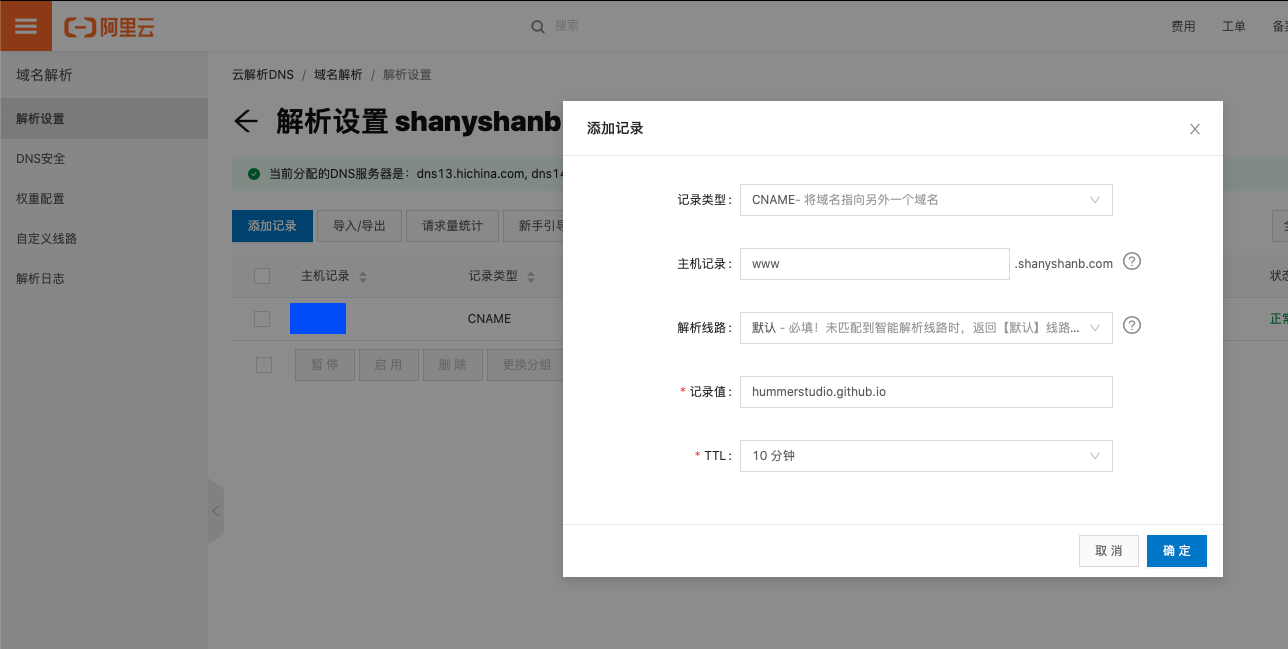
GitHub Pages officially strongly recommends that we use a second-level domain for resolution rather than the root domain (here shanyshanb.com), so here I have set www.shanyshanb.com to resolve to hummerstudio.github.io, configured as follows:
-
Add a
CNAME recordon GitHub Pages
A CNAME record must be added in both directions to take effect.
Create a file named CNAME in the root directory of the repository, and fill in the source domain. Mine contains:
www.shanyshanb.com
Commit the update to the repository.
At this point you can use www.shanyshanb.com to access the blog.
Another way to set this up is to configure the custom domain through the graphical interface on the repository’s settings page. Once set, the system automatically commits a CNAME file to the repository, with the same effect.
At first I wanted to keep the number of files in the repository to a minimum, so I chose to configure it through the graphical interface, but I found that it still produced a file. And at the time the
Savebutton on the interface was greyed out and could not be clicked, so I only solved it by taking a hacking approach; after the setting, the edit button became clickable. I’m not sure whether it was a network problem at the time or GitHub had disabled this way of doing it, so I won’t introduce that way here.)
5. Choose a Theme
To make the blog more attractive, you can choose a theme you like.
In the Theme Chooser on the settings page you can choose a Jekyll theme you like; I am currently using jekyll-theme-merlot.
After you set a theme, GitHub automatically commits and saves a
_config.ymlfile in the repository, with the following content:
theme: jekyll-theme-merlot
6. Configure the Theme
Once a theme is chosen, the page title and description text are all built into the theme, and you need to change them to your own.
Add title and description to the _config.yml file.
theme: jekyll-theme-merlot
title: 左手编程,右手文化
description: 天道有缺,人力补之。  -- 唐明
7. Customize the Styles as Needed
I made changes wherever I was unhappy with the theme’s default styles and layout.
Create an assets/css/style.scss file in the root directory of the repository, and put the modified styles in it:
---
---

@import "jekyll-theme-primer";

/* Reduce the heading size */
header h1 {
    font-size: 2em
}

/* Add top spacing to the subtitle and increase the font size */
header h2 {
    padding-top: 10px;
    font: bold italic 1em/1.5 Georgia, Times, “Times New Roman”, serif;
}

/* Increase the width of the main area */
div.shell {
    width: 1000px;
}

/* Hide span.banner-fix */
span.banner-fix {
    display: none;
}

/* Left-align level-1 headings */
.header-level-1 {
    text-align: left;
}

/* Increase the footer's maximum width */
footer {
    max-width: 1000px;
}
Visit www.shanyshanb.com again, and you’re done!