Jenkins gives you two ways to develop pipeline code: scripted and declarative.
The scripted pipeline (also known as the “traditional” pipeline) uses Groovy as its domain-specific language. The declarative pipeline, by contrast, offers a simplified and friendlier syntax, with specific statements for defining pipelines, and without any need to learn Groovy.
Version 2.5 of the Jenkins pipeline plugin introduced support for declarative pipelines.
In this article, we’ll go through all the available directives for developing declarative pipeline scripts, which will make its capabilities clear.
Declarative Pipeline Syntax
A valid declarative pipeline must be defined with the pipeline statement and must include the following required parts:
- agent
- stages
- stage
- steps
In addition, these directives are available:
- environment (defined at the pipeline or stage level)
- input (defined at the stage level)
- options (defined at the pipeline or stage level)
- parallel
- parameters
- post
- dcript
- tools
- triggers
- when
We’ll now describe each of the directives and parts listed, starting with the required ones.
agent
Jenkins provides the ability to run distributed builds by delegating them to “agent” nodes. This lets you run multiple projects using just a single instance of the Jenkins server, while the workload is distributed to its agents. The details of how to configure master/agent mode are beyond the scope of this blog. See Jenkins Distributed Builds for more information.
Agents should be labeled with tags so that they can be identified easily from one another. For example, a node can be labeled by its platform (Linux, Windows, and so on), its version, or its location. The “agent” section configures which nodes the pipeline can run on. Specifying agent any means Jenkins will run the job on any available node.
An example of its usage could be:
pipeline {
    agent any
...
}
stages
This section allows you to generate different stages on the pipeline, which will appear as different segments when the job runs.
A sample pipeline containing a stages statement:
pipeline {
    agent any
    stages {
        ...
    }
}
stage
At least one “stage” section must be defined inside the “stages” section. It will contain the work the pipeline will perform. Stages must be named, because Jenkins will display each stage in the UI, as shown below:
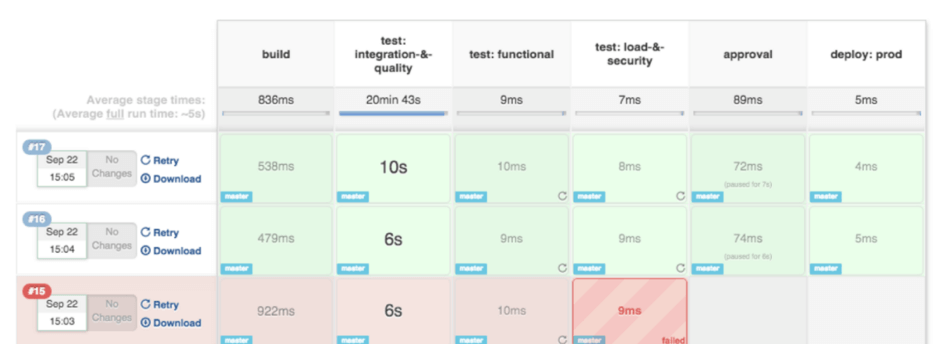
Jenkins splits the pipeline execution graphically according to the stages defined, and shows their duration and whether they succeeded.
The pipeline script for the previous image looks like this:
pipeline {
    agent any
    stages {
        stage ('build') {
            ...
        }
        stage ('test: integration-&-quality') {
            ...
        }
        stage ('test: functional') {
            ...
        }
        stage ('test: load-&-security') {
            ...
        }
        stage ('approval') {
            ...
        }
        stage ('deploy:prod') {
            ...
        }
    }
}
steps
The last required section is “steps”, which is defined inside a “stage”. At least one step must be defined in the “steps” section.
On Linux and MacOS, using a shell is supported. Here’s an example:
steps {
    sh 'echo "A one line step"'
    sh '''
    echo "A multiline step"'
    cd /tests/results
    ls -lrt
    '''
}
On Windows, you can use bat or PowerShell, as shown below:
steps {
    bat "mvn clean test -Dsuite=SMOKE_TEST -Denvironment=QA"
    powershell ".\funcional_tests.ps1"
}
The other, non-required directives are described in the following paragraphs.
environment
This directive can be defined at the stage or pipeline level, which determines the scope of its definition. When “environment” is used at the “pipeline” level, its definition is valid for all pipeline steps. If it’s defined inside a “stage”, on the other hand, it’s valid only for that particular stage.
Example usage of this directive:
At the “pipeline” level:
pipeline {
    agent any
    environment {
        OUTPUT_PATH = './outputs/'
    }
    stages {
        stage ('build') {
        ...
    }
    ...
    }
}
At the “stage” level:
pipeline {
    agent any
    stages {
        stage ('build') {
            environment {
                OUTPUT_PATH = './outputs/'
            }
            ...
        }
        ...
    }
}
input
The “input” directive is defined at the stage level and provides the ability to prompt for input. The stage will be paused until the user manually confirms.
The following configuration options are available for this directive:
- message: this is a required option, and specifies the message to display to the user.
- id: an optional identifier. By default, the “stage” name is used.
- ok: optional text for the “Ok” button.
- submitter: an optional list of user or external group names allowed to submit the input. By default, any user is allowed.
- submitterParameter: the optional name of an environment variable to set with the submitter’s name (if it exists).
- parameters: an optional list of parameters the submitter will provide.
Here’s a sample pipeline containing this directive:
pipeline {
    agent any
    stages {
        stage ('build') {
            input{
               message "Press Ok to continue"
               submitter "user1,user2"
                parameters {
                   string(name:'username', defaultValue: 'user', description: 'Username of the user pressing Ok')
                }
            }
            steps {
                echo "User: ${username} said Ok."
            }
        }
    }
}
options
Defined at the pipeline level, this directive groups specific options for the entire pipeline. The available options are:
- buildDiscarder
- disableConcurrentBuilds
- overrideIndexTriggers
- skipDefaultCheckout
- skipStagesAfterUnstable
- checkoutToSubdirectory
- newContainerPerStage
- timeout
- retry
- timestamps
See Jenkins Declarative Pipeline Options for a complete reference on this.
For example, you can configure the pipeline to retry 3 times before failing by doing the following:
pipeline {
    agent any
    options {
        retry(3)
    }
    stages {
        echo 'do something'
    }
}
parallel
Jenkins pipeline stages can nest other stages internally, and those stages will execute in parallel. This is done by adding the “parallel” directive to the script. Example usage:
stage('run-parallel-branches') {
    steps {
        parallel(
            a: {
                echo "Tests on Linux"
            },
            b: {
            echo "Tests on Windows"
            }
        )
    }
}
Starting with declarative pipeline version 1.2, a new syntax was introduced that makes using parallel syntax feel more declarative.
The previous script rewritten using this new syntax looks like this:
pipeline {
    agent none
    stages {
        stage('Run Tests') {
            parallel {
                stage('Test On Windows') {
                    agent {
                        label "windows"
                    }
                steps {
                    bat "run-tests.bat"
                }
                }
                stage('Test On Linux') {
                    agent {
                        label "linux"
                    }
                    steps {
                        sh "run-tests.sh"
                    }
                }
            }
        }
    }
}
Either of the pipelines above will look like this:
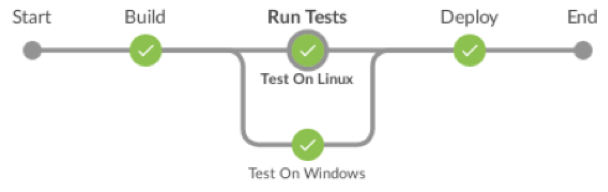
Since both scripts run platform-specific tests, they will run the tests on different nodes. If your Jenkins server has enough CPU, you can also use parallel to run stages simultaneously on the same node by using multiple threads.
There are a few limitations when using parallel stages:
- The stage directive can have a parallel directive or a steps directive, but not both at the same time.
- A stage directive inside a parallel directive cannot nest another parallel directive; only steps are allowed.
- A stage directive that has a parallel directive inside it cannot define “agent” or “tools” directives.
parameters
This directive lets you define a list of parameters to use in the script. The parameters should be provided once the pipeline is triggered. It should be defined at the “pipeline” level, and only one such directive is allowed for the whole pipeline.
String and boolean are the valid parameter types you can use.
pipeline {
    agent any
    parameters {
        string(name: 'user', defaultValue: 'John', description: 'A user that triggers the pipeline')
    }
    stages {
        stage('Trigger pipeline') {
            steps {
                echo "Pipeline triggered by ${params.USER}"
            }
        }
    }
}
post
post can be added at the pipeline level or on each stage, and the statements it contains will be executed once the stage or pipeline completes. Several post conditions can be used to control whether that post executes:
- always: the steps are executed regardless of the completion status.
- changed: executes only when the completion result differs from the status of the last run.
- fixed: executes only when the completion result is success and the last run failed
- regression: executes only when the current execution failed, aborted, or was unstable, and the previous run succeeded.
- aborted: the steps are executed only when the pipeline or stage was aborted.
- failure: the steps are executed only when the pipeline or stage failed.
- success: the steps are executed only when the pipeline or stage succeeded.
- unstable: the steps are executed only when the pipeline or stage was unstable.
Since the sentences a pipeline post contains will run at the end of the script, this is a place where you can perform cleanup tasks, notifications, and so on.
pipeline {
    agent any
    stages {
        stage('Some steps') {
            steps {
                echo 'do something'
            }
        }
    }
    post {
        always {
            echo "Pipeline finished"
            bat './performCleanUp.bat'
        }
    }
}
script
This step is used to add scripted pipeline statements to a declarative pipeline, which provides more functionality. This step must be included at the “stage” level.
Script blocks can be used multiple times for different items. These blocks let you extend Jenkins functionality, and can be implemented as shared libraries. More information about this can be found in Jenkins Shared Libraries. Likewise, shared libraries can be imported and used inside “script”, which extends the pipeline’s capabilities.
Next, we’ll provide sample pipelines. The first has only one block containing a piece of scripted pipeline code, while the second shows how to import and use a shared library:
pipeline {
    agent any
    stages {
        stage('Sample') {
            steps {
                echo "Scripted block"
                script {

                }
            }
        }
    }
}
For more information on this topic, see the article on how to use the Jenkins scripted pipeline.
tools
The “tools” directive can be added at the pipeline level or the stage level. It allows you to specify the Maven, JDK, or Gradle version to use in the script. Any of these tools must be configured in the “Global Tool Configuration” Jenkins menu; at the time of writing, all three tools are supported.
In addition, Jenkins will try to install the listed tools if they aren’t already installed. By using this directive, you can ensure that the specific version your project needs is installed.
pipeline {
    agent any
    tools {
        maven 'apache-maven-3.0.1'
    }
    stages {
         echo 'do something'
    }
}
triggers
Triggers allow Jenkins to trigger the pipeline automatically by using any of the following methods available:
- cron: by using cron syntax, it can define when to retrigger the pipeline.
- pollSCM: by using cron syntax, it allows you to define when Jenkins checks the source repository for new updates. If a change is detected, the pipeline is retriggered. (Available since Jenkins 2.22).
- upstream: takes Jenkins jobs and a threshold condition as input. When any job in the list meets the threshold condition, the pipeline is triggered.
A sample pipeline with the available triggers looks like this:
pipeline {
    agent any
    triggers {
        //Execute weekdays every four hours starting at minute 0
        cron('0 */4 * * 1-5')
    }
    stages {
        ...
    }
}


pipeline {
    agent any
    triggers {
        //Query repository weekdays every four hours starting at minute 0
        pollSCM('0 */4 * * 1-5')
    }
    stages {
        ...
    }
}


pipeline {
    agent any
    triggers {
        //Execute when either job1 or job2 are successful
        upstream(upstreamProjects: 'job1, job2', threshold: hudson.model.Result.SUCCESS)
    }
    stages {
        ...
    }
}
when
Pipeline steps can be executed based on the conditions defined in the “when” directive. If the condition matches, the steps defined in the corresponding stage will run. It should be defined at the stage level.
For the complete list of conditions and their descriptions, see the Jenkins declarative pipeline “when” directive.
For example, pipelines let you run tasks on a project that has multiple branches. This is called a multibranch pipeline, where specific actions can be taken depending on the branch name (for example “master”, “feature*”, “development”, and so on). Here’s a sample pipeline that will run the steps for the master branch:
pipeline {
    agent any
    stages {
        stage('Deploy stage') {
            when {
                branch 'master'
            }
            steps {
                echo 'Deploy master to stage'
            }
        }
    }
}
The Last 2 Jenkins Declarative Pipeline Tips
Declarative pipeline syntax errors are reported at the start of the script. This is a great feature, because you won’t waste time until some step fails before realizing a typo or a spelling mistake.
As mentioned before, pipelines can be written declaratively or in scripted form. Moreover, the declarative approach is built on top of the scripted approach, and can be extended very easily by adding a “script” step.
Jenkins pipelines are already widely used in CI/CD environments. Whether you use a declarative or a scripted pipeline, there are several advantages. In this article, we’ve covered all the syntax elements of the declarative pipeline by writing sample scripts. As we’ve already said, declarative provides a friendlier syntax without requiring knowledge of Groovy.